(Minecraft4D中文教程)
Minecraft4D is a sandbox game in 4th spatial dimiension. There are infinity generated terrains, rivers, villages and different biomes. You can build and destroy, fly and exploit. It is a simple 4D version of Minecraft. Now there is only creative mode. You can play it in your browser(Chrome recommended), and keyboard is needed to control the character, so it cannot be played on the mobile phone.
Minecraft4D
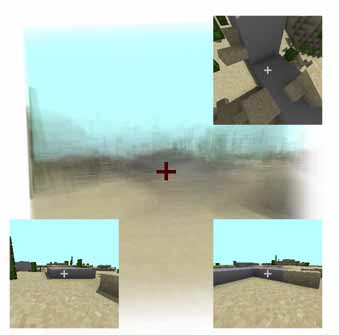
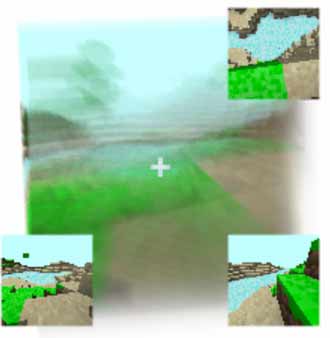
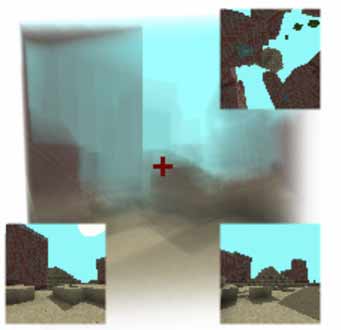
After entering the game and waiting texture to be loaded, you can see the world in two separate cubic retinas. This article explains what 3D retina is, and it will guide you to know how to see 4D objects in 4D Viewer.
Camera Controls
The picture below shows all the directions in Minecraft4D world. You can press the keys W S A D Q E to move.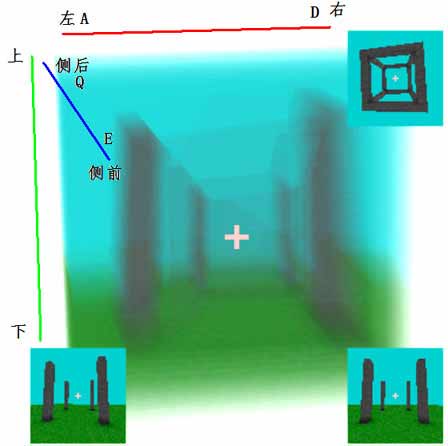
Be careful, front and back can’t be marked in th retina, because they are perpendicular to the retina. The move direction of key Q E (Blue line in the picture above) is a new direction for us: Ana and Kata. In Chinese I call it sidefront and sideback, because there are “front side” and “back side” in the retina like left side and right side.
Because of the messy overlapping colors, it’s better to show colors on some cross sections separately.
($x$ axis: Left and right; $y$ axis: Up and down; $z$ axis: New Ana and Kata direction; $w$ axis: Front and back)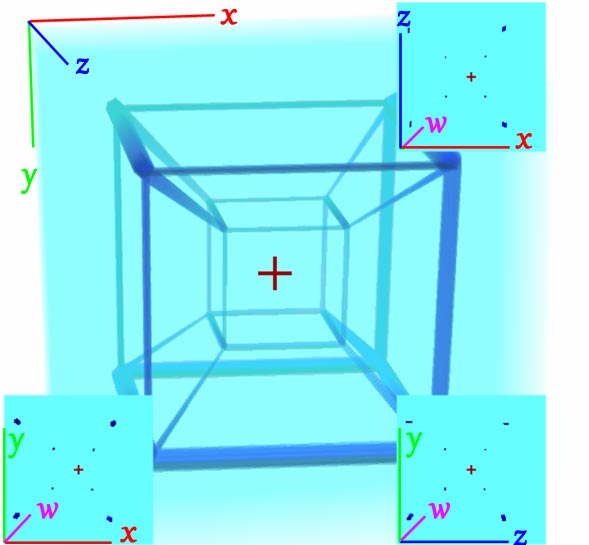
Similar to original Minecraft, click the canvas to lock and hide your mouse pointer, and move your mouse to look around. Press Esc to unlock. Note that moving mouse vertically does not correspond to look upward or downward, instead you will turn to the new 4th direction. Please scroll mouse wheel (or press key I and K if you want) to look upward and downward.
World generation
There are 2 types of world: Normal(Default) and super flat. Every time you enter the world, a random seed is generated unless a seed is given in URL. The super flat mode is also indicated in URL.
Here are some URLs of different seeds:
- Super flat: ?flat
- x=-510 z=-230 w=-440: Pyramid, stone shore, river and village (Use
/tpto teleport to)?873556 - x=34 z=72 w=64: village near a river (Use
/tpto teleport to)?962259 - x=160 z=-61 w=284: observator in a village (Use
/tpto teleport to)?661280
How to save your world: Press / to open the command, type /save to save the world as a file (Format: mc4a)
To load a world file, firstly enter a random world (regardless seeds and world types), then type /open to load your files.
Time flows in the game, if you hate the dark night, (There’s no lights in Mincraft4D yet), you can use /skipnight or /skip to pass. See more commands in Command list.
Interact with Blocks
Same as original Minecraft, Right click to place, left click to destroy, and middle click to select blocks. Be aware that the center cross is in the 3D cubic screen, it must be aligned to the blocks in 3D. Use M and N to toggle blocks (sorry no GUI here). See all types of blocks in Block list.
The 4D space is much wider that 3D one. You need to place many blocks by hand even if you want to build a small house. Therefore, it is necessary to use some plugins like World Edit in the original Minecraft. In Minecraft4D, there are similar operations in “World Edit” style. Use /w to toggle wand mode (Use this command again to quit). In wand mode, a tetracuboid selection area will be generate according to left click position and right click position as diagonal vertices. You can also use /pos1 and /pos2 to specify th exact coordinates. Use command /sel to check information of the current selection. /set <Block ID> to fill the selection area with given Block. See Block list here, and Command list here.
Shorcuts list
General Settings in 4D Viewer
Renderings
| Shortcut | Function |
|---|---|
= |
Increase 2D cross section layers |
- |
Decrease 2D cross section layers |
] |
Increase opacity of voxels in 3D retina |
[ |
Decrease opacity of voxels in 3D retina |
; |
Decrease the size of cross sections |
' |
Increase the size of cross sections |
, |
Make background darker |
. |
Make background brighter |
9 |
Decrease camera FOV |
0 |
Increase camera FOV |
C |
Wireframe mode |
Alt+[ |
Decrease wireframe width (Wireframe mode) |
Alt+] |
Increase wireframe width (Wireframe mode) |
Alt+, |
Decrease resolution |
Alt+. |
Increase resolution |
Alt+1 |
Use default rendering preset |
Alt+2 |
Use preset for 3D retina (No cross sections, more layers and low resolution) |
Alt+3 |
Use preset for cross sections (No 3D retina, big cross sections) |
| Arrow keys | Rotate the 3D retina slightly |
Character / Camera controls
| Shortcut | Function |
|---|---|
W |
Move ahead |
S |
Move back |
A |
Move to left |
D |
Move to right |
Q |
Move to ana |
E |
Move to kata |
Shift |
Descend |
Space |
Jump / Ascend |
I |
Look upward |
K |
Look downward |
J |
Turn left |
L |
Turn right |
U |
Turn ana |
O |
Turn kata |
Z |
Rotate 3D retina |
X |
Rotate 3D retina (reverse) |
Minecraft4D Shorcuts
| Shortcut | Function |
|---|---|
M |
Previous block |
N |
Next block |
/ |
Open command |
P |
Pause / Continue |
Command list
| Command | Format | Description |
|---|---|---|
| /tp | tp <x> <y> <z> <w> | Teleport player (use prefix ~ to indicate relative position) |
| /seed | seed | Show the seed of the current world |
| /fly | fly | Toggle fly mode |
| /speed | speed <speed> | Set speed of player |
| /dayspeed | dayspeed <speed> | Set day-night cycle speed |
| /skipnight or /skip | skipnight| skip | Skip the night (can only be used at night) |
| /save | save [clipboard| clip| sel| selection] | Save the world to local file without parameter, and use parameter to save the specified contents (e.g. save clipboard) into a schematic4d file |
| /open | open | Open local world file |
| /load | load [-c| clip| clipboard] | Load local schematic4d file. By default the structure will be loaded immediately relative to player. Use option -clipboard to load into clipboard rather than in the world |
| /loadmacro or /macro | loadmacro| \macro [prev] | Load local Macro file, use macro prev to execute the last macro |
| /regen | regen <me|all> | regen me: Regenerate the current chunk according to the seed; regen all: Regenerate the world completely |
| /chunks | chunks | Show total loaded chunks and modified chunks (modified chunks cannot be unloaded) |
| /wand or /w | wand| w | Toggle WorldEdit wand mode |
| /pos1 | pos1 <x> <y> <z> <w> | Set first vertex of tetracuboid selection area (use prefix ~ to indicate relative position) |
| /pos2 | pos2 <x> <y> <z> <w> | Set second diagonal vertex of tetracuboid selection area (use prefix ~ to indicate relative position) |
| /sel | sel | Check current selection infomation |
| /set | set <id> | fill the selection with a specified block type by block id |
| /hset | hset <id> | fill the surface of the selection with a specified block type by block id |
| /wall | wall <id> | fill the surface of the selection except ceil and floor with a specified block type by block id |
| /hwall | hwall <id> | fill the vertical 2D frames of the selection with a specified block type by block id |
| /copy | copy | Copy the current selection into clipboard. Your relative position will be stored like in original WordEdit |
| /paste | paste | Paste the clipboard to the world, the position is relative to the player |
| /flip | flip [dir] | Flip the clipboard toward direction dir (e.g. x, y, z or w). The default direction is front |
| /stack | stack <num> [dir] | Stack the current selection num times toward direction dir(e.g. x+, z-, f for front, u for up, d for down). The default direction is front |
| /move | move <num> [dir] | Move the current selection num blocks toward direction dir(e.g. x+, z-, f for front, u for up, d for down). The default direction is front |
| /shift | shift <num> [dir] | Move only the current selection (without blocks) num blocks toward direction dir(e.g. x+, z-, f for front, u for up, d for down). The default direction is front |
| /expand | expand <num> [dir] or expand <num> <num> [dir] | Expand the current selection num blocks toward direction dir(e.g. x+, z-, f for front, u for up, d for down). If two nums are given, selection will be expand toward and also opposide the player |
| /glome | glome <id> <radius> [<x> <y> <z> <w>] | Generate a glome of radius radius with material id. The center is at the position of the player if coordinates are not given. |
| /hglome | hglome <id> <radius> [<x> <y> <z> <w>] | Generate a hollow glome of radius radius with material id. The center is at the position of the player if coordinates are not given. |
| /spherinder | spherinder <id> <radius> <length> [<direction> [<x> <y> <z> <w>]] | Generate a spherinder of radius radius and height length with material id. The orientation of the height is given by dir. The center is at the position of the player if coordinates are not given. |
| /hspherinder | hspherinder <id> <radius> <length> [<direction> [<x> <y> <z> <w>]] | Generate a hollow spherinder of radius radius and height length with material id. The orientation of the height is given by dir. The center is at the position of the player if coordinates are not given. |
| /duocylinder | duocylinder <id> |
Generate a duocylinder of radii radius1 and radius2 with material id. The orientation of two perpendicular circles is given by dir(e.g. xy or xz). The center is at the position of the player if coordinates are not given. |
| /tiger | tiger <id> |
Generate a tiger of radii radius1, radius2 and radius3 with material id. The orientation of two perpendicular circles is given by dir(e.g. xy or xz). The center is at the position of the player if coordinates are not given. |
Macro
In Minecraft4D world, the blocks increase dramatically with the increasement of the size. Building operations are often done with many commands. For convenience, a series of commands can be put together into a text macro file. Use /macro to load a macro and to execute those series of commands at once. def <Constant identifier> Value is supported to increase readability. A code block can be defined beginning with fn <code block identifier>: and ending with endfn. You can reuse the code block by command <code block identifier> anywhere. (Recursive reuses are not allowed, which will crash the game -_-)
In the macro, you can use almost all the commands in the Command list, but file operations are exceptions: \save \open \load \macro.
Example: A small town with 26 houses.
Block list
| Number ID | Name ID |
|---|---|
| 0 | air |
| 1 | stone |
| 2 | grass |
| 3 | dirt |
| 4 | oak_log |
| 5 | leaves |
| 6 | brick |
| 7 | sand |
| 8 | water |
| 9 | smooth_stone |
| 10 | stone_slabs |
| 11 | stone_brick |
| 12 | planks |
| 13 | white_concrete |
| 14 | red_concrete |
| 15 | yellow_concrete |
| 16 | green_concrete |
| 17 | cyan_concrete |
| 18 | blue_concrete |
| 19 | purple_concrete |
| 20 | gray_concrete |
| 21 | black_concrete |
| 22 | catcus |
| 23 | creeper_head |
| 24 | enderman_head |
| 25 | steve_head |
| 30 | glass |
Scenary list
(More images need to be added)
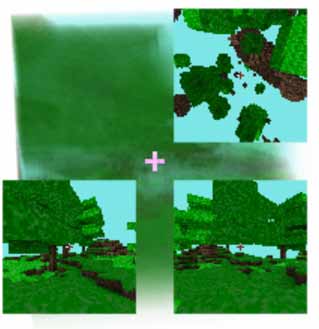
- Forest
- Desert

- Desert Pyramid
- River
- Village
- Desert Village
- Observator
- Desert Well
- Swamp
- Road